Bookmarking this link here, for the future:
Jelinek Cork - Shoe Wedges
They also sell blocks of cork, granulated cork, cork sheets.... with an online store.
Showing posts with label Supplies. Show all posts
Showing posts with label Supplies. Show all posts
Thursday, September 15, 2016
Thursday, July 9, 2015
Ashland Shoemaker Symposium
A couple of weeks ago, I was able to attend the first ever Shoemakers' Symposium in Ashland, Oregon. It was a fantastic experience.
I don't have a ton of photos, but I think the high point for me was the opportunity to socialize and geek out with other makers of shoes. We're an odd bunch, but I found some kindred spirits there, learned a lot, and made some great connections with some of the vendors. Shoe making equipment, tools, and supplies are hard to find - it's great to be able to actually *talk* to the people who can provide those things. Many of them don't have websites or online ordering - you just have to know who has the thing you want, and call them up. Like, on a telephone. How last century! Of course, we're making shoes by hand, here.
I just had to purchase some leather, of course. I got some frog skins, and lizard, and ostrich shins. (This is not my haul - this is the vendor's table.)

There was also a competition - these are some of my personal favorites of the submitted shoes:

These amazing boots were inspired by a sculpture. You can't see it in this photo, unfortunately, but the stitching and overlay work is really amazing - almost every color you see is a separate piece of very thin leather, not paint. (There's a little bit of shading done with dye, but mostly, it's separate pieces of material.)

I had seen photos of these before - Deborah's very cute star cutout pumps. Now I got to see them in person.

Rose, who was in my class last year, and was a speaker at the symposium, made these, and won the People's Choice award for them. Very sharp - and exactly what I would have expected from her!
Again, a really great weekend. Lots of good food, and wine, and interesting people I want to stay in touch with. I'll be heading back down to Ashland on Sunday to start a two week long class on fashion boots - so there will be more shoemaking stuff here shortly!
Wednesday, February 4, 2015
Shopping!
Found another source for supplies: Sorrell Notions and Findings
http://www.customboots.net/customboots.net/SNF_home.html
Lisa Sorrell is a master cowboy boot maker. Having the same difficulty as many of us in finding supplies, she set up shop and sells a variety of tools, adhesives, and other supplies. As I'm already using one of her skiving knives (purchased from Bill Shanor at shoe school), I've just now picked up an appropriate sharpener for it.
She's also got a phenomenal selection of size 33 thread - tons of amazing colors. I'm not sure it's heavy enough for what I want to do - but it's an amazing resource to have available.
She also has a YouTube channel, and produces a periodic "It's A Boot Life" series, which includes footage of her working in her studio, product reviews, expos she attends, and a variety of miscellanea.
It also looks like Montana Leather has some Kangaroo hides - mostly earth tones, but also sky blue, lavender, and lilac - at $15.95/sq ft. (As most hides run around 4-6 sq ft, that's about $60 - 100 per hide, which is a little high.) So, not great prices, but some selection you might not get elsewhere.
Wednesday, July 23, 2014
Making other things...
Also just finished a blouse:

It's made of linen, from the fabric store, and one of the most nicely-finished garments I've ever made. And I did it the right way, too. I had an old Vogue pattern, and made a mock-up, and altered it until it fit properly, and made a new pattern. And I finished all my seams, for once. And learned how to make bound buttonholes. Overall, I'm very happy with how it turned out.

I also bought three yards of this:

I have no idea what I'll do with it, but I love it. Maybe another blouse? perhaps a more oxford-style one this time? I think as a dress, it would be too much all in one place, and be overwhelming.
Wednesday, February 26, 2014
Finally, they're starting to look like shoes
I don't know yet if it's just this particular pair of shoes - the suede I chose is a little heavier than the kangaroo leather I'll mostly be working with in the future - but my sewing machine did not like sewing the lining to the outer suede. Even with a walking foot, it did a really shitty job of keeping tension. Since these shoes are for me, and they're sort of an experiment/learning experience all around, I kept the mostly-ok bits, and hand-sewed the rest. Ugh.

Then, trimmed off the excess lining material.

A couple of things had to happen before I could start lasting. For starters, my home-made ghetto lasting stand was too tall. So I had to unscrew the steel pipe, and take it out to the garage, and cut about 8 inches off it. Now, when I put the last on the stand, I can brace it with my knee.
Also, I made sure to test the hinges - to make sure that the glued-on modifications I made to the last wouldn't make it impossible to get the shoe off once it's done.
Then, I had to drive to Fred Meyer. Because it turns out I don't have an old bottle of baby powder in the bathroom. I didn't even know where they kept the baby powder at the store - I had to ask.
Also, I'm going to be adding a 1/4" thick comfort insole into the bottom of these shoes, so I grabbed some fun foam sheets, glued them together (to get approximately 1/4" thickness) and cut out some insole shapes, so that the final shoe will have enough room in it to slip in the blue comfort foam. I put the last on the stand, put the fun foam on the sole, and then the insole I made previously. Nailed it on with three nails, positioned toward the middle, where I'll be able to get them out again after the shoe is lasted.
So - under normal circumstances, you'd powder the inside of the upper liberally with baby powder, to help get the shoe off the last when you're all done. Because I'm working with suede, and it's a flat (which means it'll be easier to get it off the last anyway), I powdered the last, rather than the leather.

Then the nailing begins! My lasting pliers are a little large - I may eventually invest in a second pair with more pointy grippers.

After it was all nailed down, I sprayed it liberally with shoe stretch - I'm hoping that as it dries, it'll form a bit into this shape. The next step (probably tomorrow) is to carefully take out the nails, and glue down just the lining to the insole, all the way around.

Both shoes are at this stage - and they're sort of looking like shoes! That's kind of exciting. I started making the toggles that will hold those two straps down. There are still a couple of different ways that could all shake out, and I'm not sure which way I want to go with that.

Monday, February 17, 2014
Heels are finished, made top line tape, more colors!
Sent my skiving knife off to get sharpened, which has ground everything to a halt here.
On the other hand, I did finally make top line tape. Top line tape runs around the upper edge of a pump, to give the top line of the shoe some reinforcement. Leather stretches - this stuff doesn't. You can purchase top line tape, but I made some (like we did in class) from two layers of nylon ripstop fabric, glued together with Duall 88, and cut into 1/4" strips.


What I haven't been able to figure out is the color scheme for this shoe. I now have a whole lot of colors, but can't choose. And even once I choose, which color should be the dominant color (toe, heel, lace area) and which the background/accent color? I've got cobalt blue, turquoise, light blue metallic, lilac, hot pink, light pink, orange, scarlet, black, white, and gold metallic, as well as a matte black and both grey and orange/brown suede. And other than the black/red and black/white, I'm not sure I like any of the colors together. It's a problem. Any comments from the peanut gallery?


On the other hand, I did finally make top line tape. Top line tape runs around the upper edge of a pump, to give the top line of the shoe some reinforcement. Leather stretches - this stuff doesn't. You can purchase top line tape, but I made some (like we did in class) from two layers of nylon ripstop fabric, glued together with Duall 88, and cut into 1/4" strips.
I also got my shipment from Sheridan Leather - Kangaroo in Fuchsia, Pink, Scarlet, and Orange. Their prices are really good (about half what anyone else is charging) so I figured I'd grab these while I can. They're out of the fuchsia now - I got the last one.
I've also finished making the oak heels. I don't know if this will work or not - again, wood is not recommended for heels, because it splits. On the other hand, I don't have a lot of choices, and the oak is free. I think I did pretty good at getting the two to match eachother fairly well. Once the shoes are lasted, it'll be easier to tell if they're a.) the correct height and b.) cupped enough on the top.
I think I've finalized the design for the second shoe. Again - horrible lighting for photography in my workshop, but I think you can see the pencil lines clearly enough. I ordered a book - Handmade Shoes for Men, by Lazlo Vass and Magda Molnar, which I'm hoping will answer some questions I have about the area where the laces go, and how the lining interacts with the outer in that area.
What I haven't been able to figure out is the color scheme for this shoe. I now have a whole lot of colors, but can't choose. And even once I choose, which color should be the dominant color (toe, heel, lace area) and which the background/accent color? I've got cobalt blue, turquoise, light blue metallic, lilac, hot pink, light pink, orange, scarlet, black, white, and gold metallic, as well as a matte black and both grey and orange/brown suede. And other than the black/red and black/white, I'm not sure I like any of the colors together. It's a problem. Any comments from the peanut gallery?
Tuesday, February 11, 2014
Multiple packages from overseas...
FOUR separate packages arrived for me today. It's kind of crazy - wait for weeks, and then it all comes at once.
Today's windfall was:
Linda O'Keefe's book, "Shoes" - mostly pretty pictures. I picked it up on Amazon for one penny plus shipping. Good inspiration.
Both of the kangaroo hides I purchased on Ebay (from two different vendors) arrived today from Australia. The "licorice" black one sort of looks like they tried to tie dye it - it was cheap, even with the international shipping, so I'm ok with that. The second one is even better than it looked in the photo - cobalt blue, and huge.
Finally, from the Czech Republic, a leather stamp with my sun/moon logo. Custom order off Etsy. Considering where it came from, very fast and very reasonably priced. Here's what a stamp of it looks like:

Tomorrow is a day off work for me, so I'll be starting on making patterns for my shoes. The oxford style one is still giving me trouble. Maybe now that I have *so much* leather, in so many different colors, I'll be able to do this thing.
Maybe not.
Today's windfall was:
Linda O'Keefe's book, "Shoes" - mostly pretty pictures. I picked it up on Amazon for one penny plus shipping. Good inspiration.
Both of the kangaroo hides I purchased on Ebay (from two different vendors) arrived today from Australia. The "licorice" black one sort of looks like they tried to tie dye it - it was cheap, even with the international shipping, so I'm ok with that. The second one is even better than it looked in the photo - cobalt blue, and huge.
Finally, from the Czech Republic, a leather stamp with my sun/moon logo. Custom order off Etsy. Considering where it came from, very fast and very reasonably priced. Here's what a stamp of it looks like:
Tomorrow is a day off work for me, so I'll be starting on making patterns for my shoes. The oxford style one is still giving me trouble. Maybe now that I have *so much* leather, in so many different colors, I'll be able to do this thing.
Maybe not.
Friday, January 31, 2014
Buying out the internet
Every day is like Christmas lately - I've been on an internet buying spree, getting all the tools and supplies to make shoes, and a package arrives almost every day.
Yesterday, I received my order from Shoedo. Celtec (insole material), Shank board, fiberglass shank material, thermo-activated material for making toe boxes, two pairs of used lasts, and six pairs of heels of various heights. Seems she also threw in a sheet of soling material for me, free. Yipee!

So now I can start on my first pair of at-home shoes. I won't go into the process of measuring here - I already had my measurements from class. However, the shoes I made in class were a little small, so I'm buying lasts in a half size larger, and because I have such horribly wide feet, I'm modifying them as well.
These used lasts came with little metal plates on the toes. I don't know why - I can only imagine that there's some machine used in commercial shoemaking that needs it this way. Some of the lasts at Shoe School had metal plates on the heels, as well. Making shoes by hand, you have to be able to nail into the last all the way around the sole, so the metal plates have to go.

I pried them off, and will be replacing them with some leather. Also, the places where I need a little more width across the sole, I'll be adding some leather there as well. First step - a highly technical process that might be called, "scraping the hell out of the leather and the part of the last you want to glue it to". Then I applied contact cement (Duall 88, purchased from Manhattan Wardrobe Supply. Interesting selection of stuff there.) to both the leather and the last, and let it dry for 15 minutes or so.
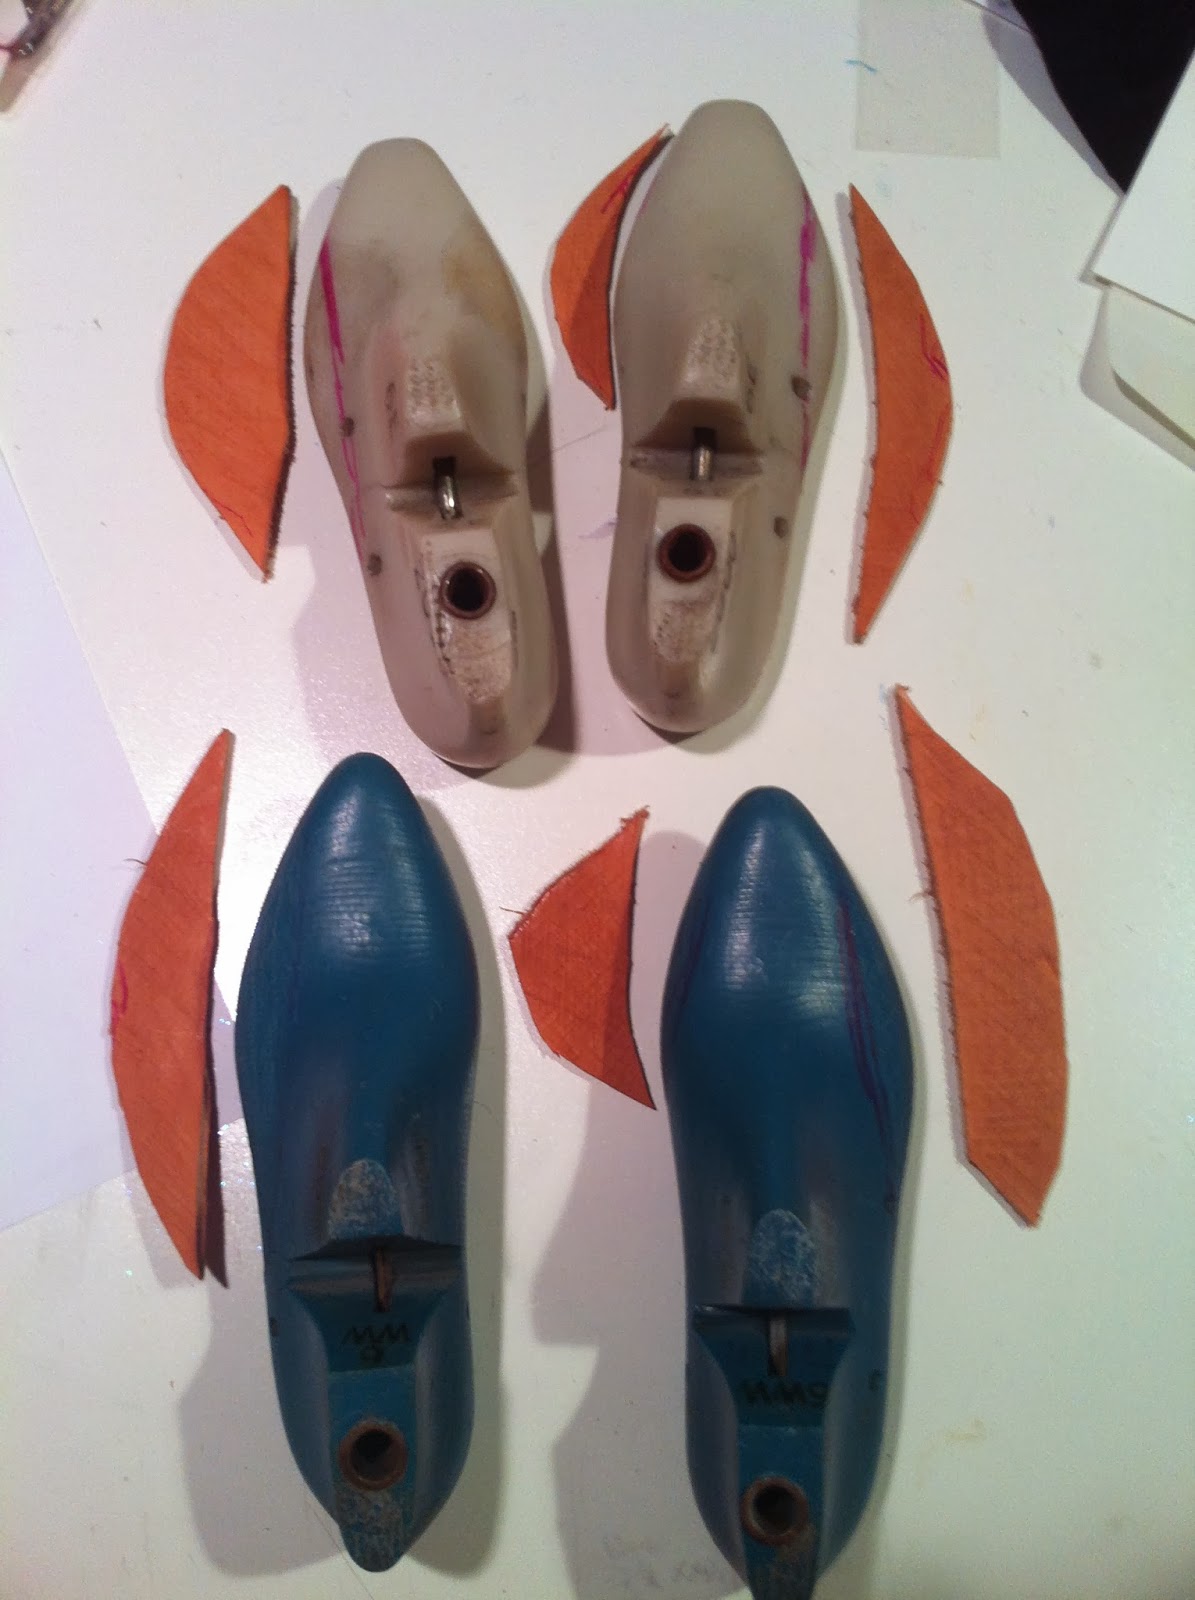
Stuck the leather on the lasts, and let it sit overnight to bond all the way.
Today, I'll carve down the leather a bit, and clean the garage so there's a place to put the belt sander I need to purchase today to sand down the edges of the leather. Unfortunately, that's all the further I can go until I receive the press cement (also known as Toe Hardener) from Panhandle Leather. I ordered it on Monday, so hopefully it will arrive soon.
Still, it's all so exciting!
Yesterday, I received my order from Shoedo. Celtec (insole material), Shank board, fiberglass shank material, thermo-activated material for making toe boxes, two pairs of used lasts, and six pairs of heels of various heights. Seems she also threw in a sheet of soling material for me, free. Yipee!
So now I can start on my first pair of at-home shoes. I won't go into the process of measuring here - I already had my measurements from class. However, the shoes I made in class were a little small, so I'm buying lasts in a half size larger, and because I have such horribly wide feet, I'm modifying them as well.
These used lasts came with little metal plates on the toes. I don't know why - I can only imagine that there's some machine used in commercial shoemaking that needs it this way. Some of the lasts at Shoe School had metal plates on the heels, as well. Making shoes by hand, you have to be able to nail into the last all the way around the sole, so the metal plates have to go.
I pried them off, and will be replacing them with some leather. Also, the places where I need a little more width across the sole, I'll be adding some leather there as well. First step - a highly technical process that might be called, "scraping the hell out of the leather and the part of the last you want to glue it to". Then I applied contact cement (Duall 88, purchased from Manhattan Wardrobe Supply. Interesting selection of stuff there.) to both the leather and the last, and let it dry for 15 minutes or so.
Stuck the leather on the lasts, and let it sit overnight to bond all the way.
Today, I'll carve down the leather a bit, and clean the garage so there's a place to put the belt sander I need to purchase today to sand down the edges of the leather. Unfortunately, that's all the further I can go until I receive the press cement (also known as Toe Hardener) from Panhandle Leather. I ordered it on Monday, so hopefully it will arrive soon.
Still, it's all so exciting!
Subscribe to:
Posts (Atom)