Showing posts with label Boots. Show all posts

Tuesday, September 29, 2015

Proper photos are important!

 
Finally, I have good photos of some of the finished projects lately!  I think that the importance of having good pictures of your work can't be overstated.  And I have to say - I'm just thrilled with how these came out. 
 
All photos, with the exception of the two with Julie Bonney's copyright on them, are by Austin Lang.  While I do well enough with product shots of my shoes, occasionally enlisting the assistance of a professional is warranted.  Julie Bonney is part of the Bonney and Wills Shoe School, and took these two photos at the end of boot school.  Austin Lang is a local (Olympia) photographer who also took the gorgeous cast photos for Tartuffe. 
 
When I do take my own photos of finished shoes, I usually try to go somewhere outside, in nature.  The background is nice, and the lighting is generally pretty safe.  For really good product shots, you simply *must* have proper lighting, and know a lot more than I do about photography.  Costumes are particularly hard to get good photo of yourself - the difference between a selfie or a snapshot in your living room, and a professionally done photo with a backdrop and good lighting is significant.  Austin sure knows how to make me look good!
 
And yeah, this post is basically just picspam.


Tuesday, July 28, 2015

Boot School!

I'm back from a two week intensive boot making class, at Bonney and Wills School of Shoemaking.
 
 
Here's what the five of us in the class created in two weeks.  !!!  Pretty exciting, right?

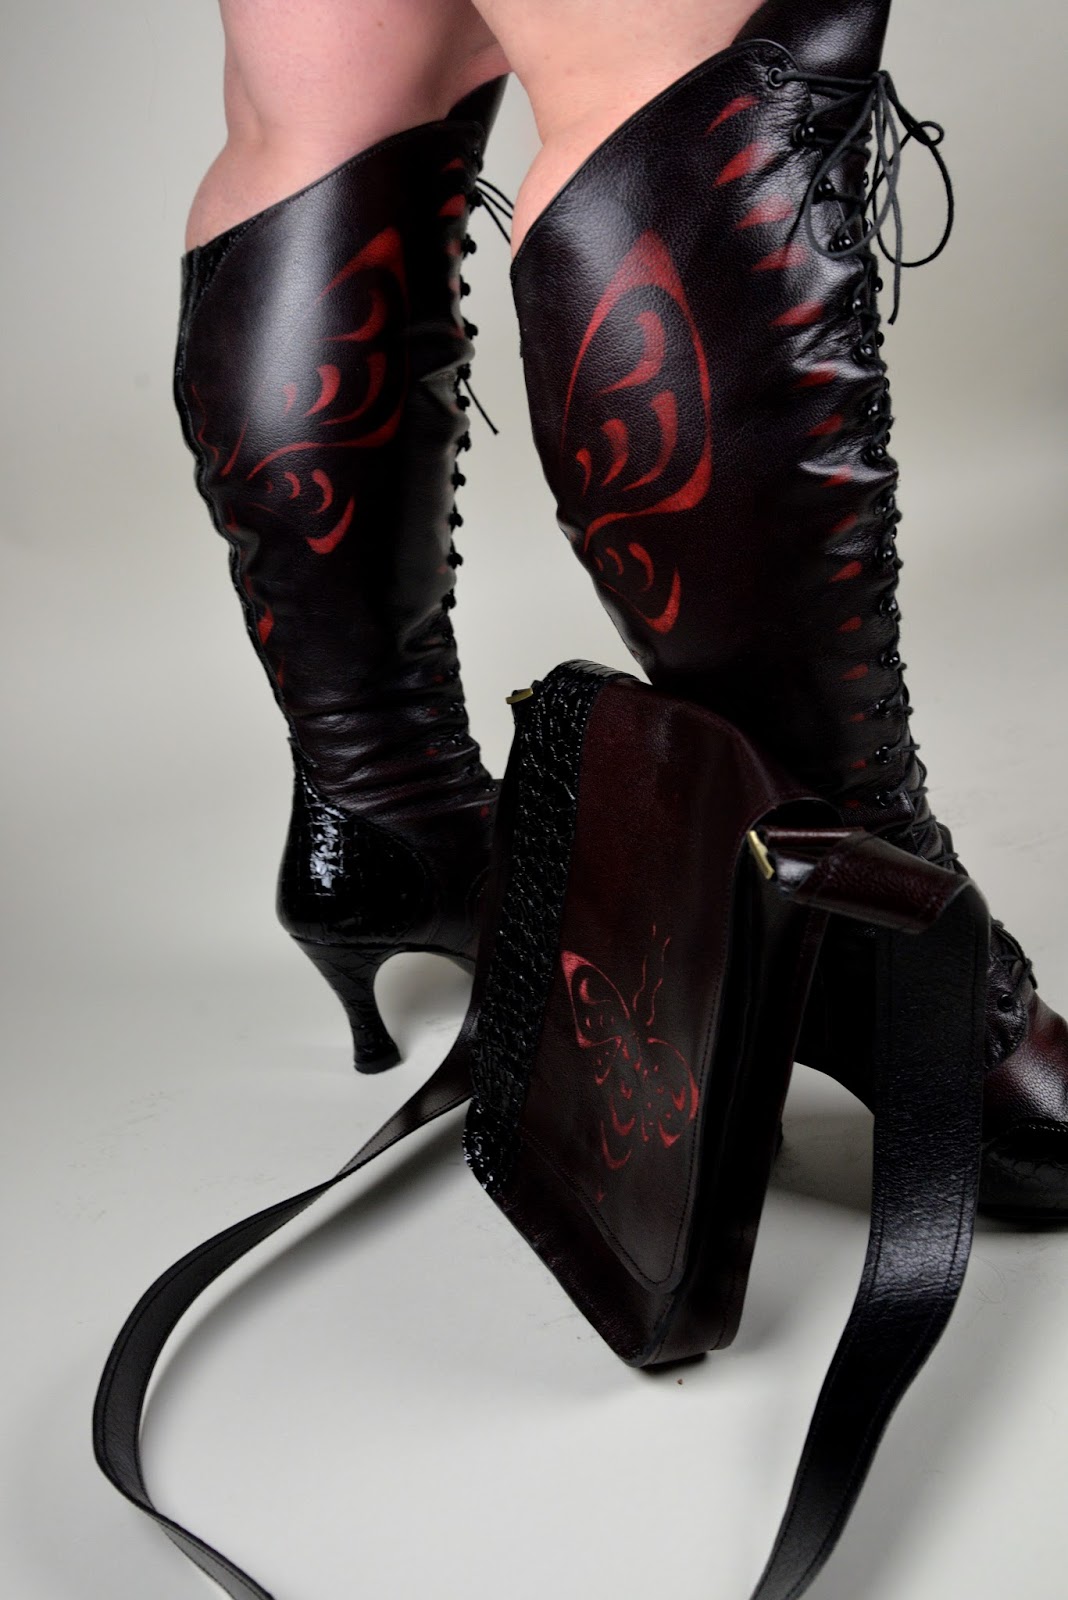
But enough about everyone else.  Here's *my* boots:


Those photos were taken before the boots were really stretched in - the lace gap up the front is now narrower, and I'll have some proper photos taken once I have the matching purse to go with them.
 
It would be impossible to put everything from those two weeks into one blog post, so here are a few highlights:
 
 
Modifying lasts
 
The last I used was a boot last with a pretty horrible, long, square, up-curved toe.  We chopped it off, and turned it into the rounder toe I prefer.  Also, a little extra material was added onto the sides at the ball of the foot, because I have freaky wide feet.


Designing the boot

Making patterns for boots is pretty cool, and now I know how to do it.  But you still start the same way:  tape the last, design the foot part of the boot. Then that design is made into a 2-D pattern, and that pattern is continued up the shaft of the boot to the desired height.


Cutting and sewing the uppers and lining

My boot had a lot of piping, and the wingtip and heel cap were this really shiny, squishy faux alligator (sheep skin, of all things). The lining is an orthopedic calf in cream, very soft, and was stitched to the outer at this point.  I took my own sewing machine with me to class, because I'm familiar with it, and it's what I'll be using now that I'm back home, as well.  Unlike my first class, this time the sewing went really smoothly.  I'm very proud of my stitching this time. 


Brush-off design, eyelets, and hooks

I came to this class with very few pre-conceived notions about what I'd be making, other than that it would be a boot, and likely knee-high.  I had seen some boots our instructor had made, using a brush-off goatskin, and I was intrigued by the material.  Basically, the leather is dyed red (or brown), and then a dark coating is applied.  You "brush off" the coating to reveal the red underneath.  Generally, it's brushed off sort of all over, or all over after stitching, so that the places where the parts intersect get highlighted.  Sometimes, a cord or other object is placed underneath to make a pattern.  I wanted to do something more intricate.  So I designed a honeybee (based on a tattoo found on the internet, of course) and made a stencil from poster board.  The stencil was rubber cemented to the leather, and the design brushed off with a polishing brush on a grinder.


This is the point where I should have put in the eyelets and hooks, but it wasn't critical that it didn't happen until after I sewed together the shafts.

Then the outer was assembled.


The back seam was actually zig-zagged, then pounded flat.  Reinforcement tape was applied up the seam, on the outside, and then a decorative back strap placed up the seam, to cover the reinforcement tape.  The heel cap was attached at this point, too.

The tongue (which was, oh my god, very long) was attached to the vamp, and the vamp attached to the quarter. 

Of course, an insole had to be made.  And a platform.  Here's the back part of the insole:

 
And here's the platform going on.   The platform is made from Birko cork, which apparently can be purchased from shoe repair suppliers, like O. Baltor & Sons in San Francisco.  It's basically ground up cork, suspended in a rubber adhesive.  You cut it to size, warm it up, and stick it to the insole, where it'll form nicely until it cools down.  Then you can sand it to shape.


Next we laced up the vamp so it wouldn't stretch out, and lasted the boot.  Those tall sides meant there was a lot of leather flapping around.  Once lasted, I cleaned up the bottom, added filler, and glued on the sole.  Next, I completely forgot to stamp my logo into the sole,  (DAMN!) and attached the sole.  Then the boot could be un-lasted, and the heel attached properly.
 
 
All that remained was to clean the whole thing up, make and insert the sock liner, and polish the whole thing with a coat of neutral shoe polish.


Generally speaking, boot school was an amazing experience.  I really enjoyed the people I met in class, and we all made something different, so I got to learn about oxfords, zippered boots, and western construction, even without making any of those things myself.  One student had been there for an additional two weeks prior, and was also making a pair of welted high heel oxfords - I was very excited to see that process, and I think I have a pretty good handle on it now. 

We were a little ahead of schedule, and there was a lot of time spent waiting for glue to dry, so I made a pair of sandals (post to come) and another student made some leather flip-flops. She happens to live nearby, so now I have a shoe-making buddy locally - someone to share information and resources with - which is pretty fantastic.  Mostly, my two weeks in Ashland were tremendously exciting, and exhausting, and just jam-packed with great learning.  I can't wait to make another pair of shoes now.


Monday, February 9, 2015

First pair of boots - Done!

The Boots Are Done!!!


So, to re-wind a bit, let's go back to where we left off before.  I needed to make the insoles.  Here's the insole material (celtek), with shank board glued on.  The shank board was soaked, then duct-taped to the lasts overnight to shape it.  The shank board is on the top (foot side) of the insole.
 
 
As previously, I glued on a piece of the liquid fiberglass shank material, then tacked folded up tin foil around it and heat set the shanks.  The tin foil is to keep the celtek from burning.  This is the bottom (pavement) side of the insole.


I don't have photos of the next bit - mixing a 2-part expoxy, putting on a layer of fiberglass, then more epoxy, then a suede shank cover. 
 
Then I got to work lasting.  This is the fun part!  It really starts to look like it might work!
 
 
Once it's all lasted and glued down, I take out an exacto knife, and cut away all but about a half inch all the way around.  I glue cork (the rolled up cork sheets from the craft store) into the spaces, and then sand it down as smooth as possible on the belt sander.
 
 
Now they're ready for soles.  Which I should cut out.  Usually I use soling material - the black, rubber-like stuff.  It's really durable, pretty easy to cut, and made for this.  For this particular shoe, I wanted something more like a welted riding boot look (without the hassle of welting), and I didn't want the soles to be black, so I'm using thick leather.  I also took the opportunity to emboss in my logo.  Which I put too far forward.  I'll remember that next time...
 
 
And I dyed the soles a dark mahogany color.
 
 
Glued the soles onto the boots, and was ready to take the lasts off.  !!!  This part is so exciting!
 
Took a few minutes to make the comfort insoles and sock liners.  Insole is 1/4" poron, the sock liner is more of the brown pigskin suede I used for the lining.  I've used the *entire* piece of suede on this one project.  That's kind of crazy.  The sock liner is glued to the poron. 
 

Still had to make the heel blocks.  I've done a ton of photos on this, showing every little step.  Heels are very 3D items, and you have to have two exactly the same.  I'm hoping to find some more sources for heels, because carving them out of white oak isn't, I think, a good long-term solution.  The wood will eventually break from the impact, if nothing else. 

So - I started with a block that was the right height and width.  I traced the angle of the sole, making sure I still had about 1/4" of toe spring, and cut the top off at that angle.  I also rounded off the back profile.


Then, give the top a sloped concave curve, to account for the fact that the bottom of the shoe is not flat.


Check this against the boot, and draw the front and rear.


Oops - this one got caught in the saw, and is now firewood.


Don't forget - you have to make two that are identical.


Next, the heel breast - that's the front edge, which should have an inward curve.


Not pictured here - the final shaping step, which was to angle the sides in a little from top to bottom.  These wood heel blocks were then stained with a dark mahogany wood stain, and attached to the boots with a 1 1/2" screw.  The comfort insoles were put in, and it was time to try them on:

 
THEY FIT!!!  I was so excited, I had to wear them to go out to dinner.
 
Lots of lessons learned on this one.  I think the biggest things here are that while it's possible to use 4oz tooling leather, and do tooling and dye it however you like...  it's not easy.  I'm not sure I'd do that again without a really good reason. 
 
Second important lesson:  a few days after I sewed the uppers together, I watched a great video of Lisa Sorrell using her crimping boards on cowboy boot vamps.  Given the sort of weird fit at the ankles, and how difficult it was to last these without horrible huge wrinkles at the vamp point, I'm absolutely going to make a crimping board before I attempt the next pair of boots. 
 
Also, I'm not convinced that doing a welted construction wouldn't have been the better option for these.  But - since I've never done that, and don't have a lot of the tools, I think that's a project for another day.

Overall, however, I'm really pleased with how these turned out.  I'll absolutely be able to walk the couple of blocks from our hotel to the party in them, without getting sore feet or blisters, and that's great.  Yay!  Boots!