
It's finally done! Yippee! (And now, updated - see bottom of post for more information...)
So - this bugger took FOREVER. I wanted to do a corset based on the armor of the Rohirrim in Peter Jackson's Lord of the Rings films. I've done several modern corsets - well, what I think of as "modern" - sort of princess seamed, no gussetts, 12 panels. I wanted this one to be more evocative of the armor shape. So I went with an Elizabethan style, sort of like the Effigy corset. This corset shape is much more conical, with the tabs around the bottom, sort of like the tappets on the Rohirrim armor. It's only 6 panels.
So - took my measurements and made a pattern. Cut it out of brown twill (twice - once for the outside, once for the lining) and sewed it together. The actual hero-armor (remade in lighter materials for filming) was plate hammered into shape, then covered with a tooled and dyed leather overlay. I painted the twill with metallic latex house paint. It actually looks pretty good.

Then, I designed the leather overlays.

And transferred those patterns onto tooling leather. Unfortunately, this was my first time ever tooling leather, and I cut out everything - and got it soaking wet. So the pieces stretched a lot. They no longer matched the fabric they were to sit on top of. It was really unfortunate. So I did it all again. This time, I didn't cut it out first - I did the tooling first.
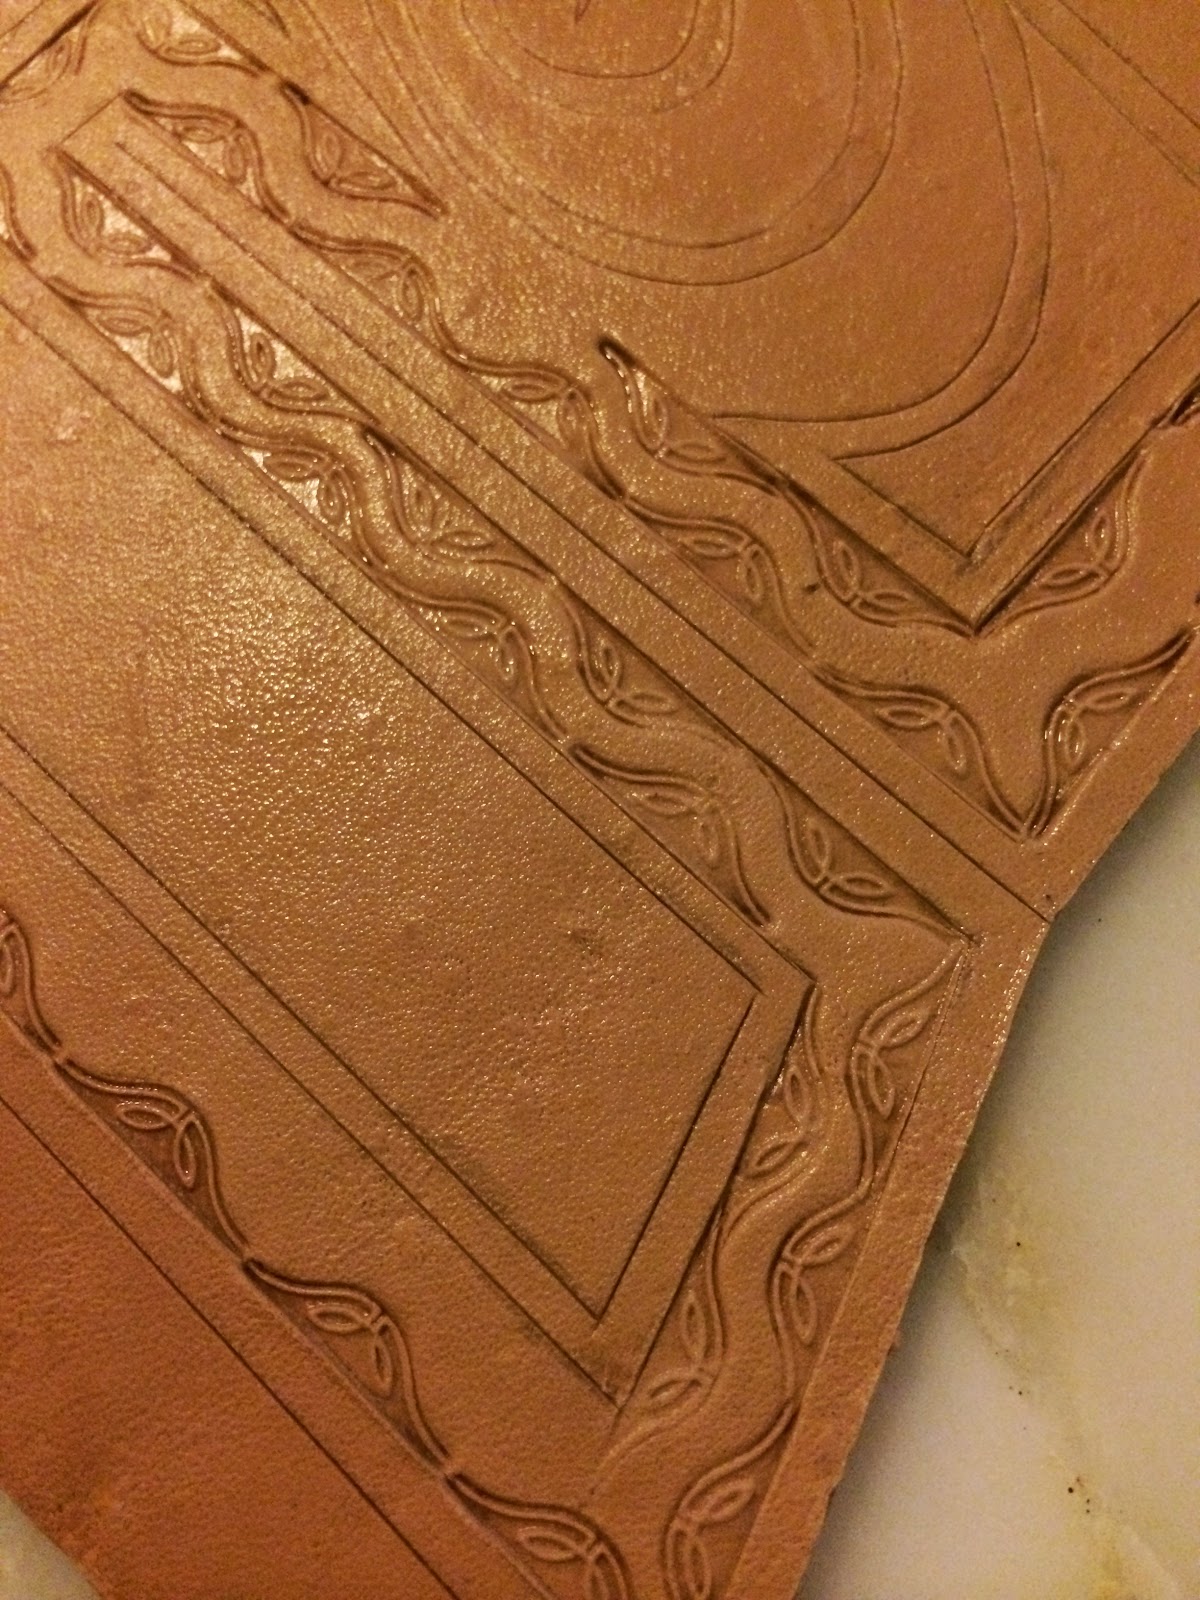
THEN I cut out all the pieces.


Keeping with the Rohirrim style motifs, you'll see horse heads repeating. (You might also notice just the slightest amount of stretching. DAMN IT!!!)
Next, I dyed the leather (Fiebing's Oxblood) and buffed it with a mahogany leather stain so that the tooling would show nicely.


Next, time to put the channels for the boning into the lining. I use bias tape. I've had people ask why I purchase bias tape when I could make my own. I figure, why should I make my own when they sell it for cheap at the fabric store, and I have better things to do with my time. The boning on the front and back panels is 1/2" spring steel, the side panel uses doubled 1/4" spiral steel.

Then I stitched the leather onto the gold-painted corset. I chose an orange heavy-duty nylon thread, because I really wanted those stitches to show.


Sewing the lining into the corset was a huge pain in the ass. For starters, it all had to be hand-sewn, and I couldn't use any of my usual tricks, because of the leather. So I thought I'd do a blanket stitch around a piece of waxed cord, with brown embroidery floss, to give it some substance. This was a bad idea. It looked terrible. And it took longer to remove than it did to sew it in the first place. And I'd done one entire side, top and bottom. In the end, more bias tape was the way to go. All told, just sewing the lining in took over a week of pretty much working on it all the time, much of that devoted to removing the waxed cord.

A couple of months ago, when I was starting this process (before going on vacation), one of the guys at work very kindly drilled holes in some spring steel boning for me, so I could put on the brass swing latches that I wanted to use instead of a standard busk. I would NOT recommend this to anybody. If you must use swing latches, find ones that can be riveted to lacing bones (as in, the center to center measurement of the latches is equal to the center to center measurement on the bones that come with holes already in them.) Spring steel is extremely hard, and the guy who drilled them for me went through a drill bit for every two holes. So, 14 drill bits. And it wasn't pretty.
Regardless, I was able to attach the latches, and to put the grommets in the back and on the shoulders.

Here it is on me, in a test fitting. The white ribbon is what I had laying around - I'll need to find something more appropriate. Also, I'm terrible at tying the laces behind me, so that explains a little why it's not tightened very well, or tied nicely.


So excited that it's done! Now, I need to very quickly make a pair of matching boots! (And the dress that goes underneath it, and possibly a cloak, and maybe a little purse....)
EDITED TO ADD:
So - I made the dress that goes underneath this thing, and discovered a few problems.
Problem #1 - the bottom edge of the back dug into my butt in an unattractive way, and made the skirt underneath poke out weirdly. Solution: I removed the 1/2" spring steel boning and replaced it with 1/4" spiral steel boning (because that's what I had available). Now, the bottom of the back bends outward a little more, and doesn't poke me.
Problem #2 - those cool swing latches. As long as I didn't move, they were great. As soon as my left shoulder went up, they all popped right out of their holes, and the whole corset popped open. This is... less than ideal. The problem is that any sort of vertical shift caused the whole thing to fail. I didn't want to sew the front of the corset closed - it's too hard to get into if you have to completely re-lace it to get into it. I made a front "modesty panel" from the same fabric as the chemise, and put large rectangles of industrial-strength velcro on both the panel, and the inside of the front of the corset. Now, to put it on, I velcro it into place, then shut the latches. Works like a charm, and doesn't allow for any vertical slippage. Totally invisible from the outside. Yippee! The only problem here is that if I want to wear something that's not cream colored underneath, I'll have to cover up the velcro/modesty panel, but I figure a piece of ribbon or something will do just fine for that.
No comments:
Post a Comment